Tampilkan postingan dengan label frame. Tampilkan semua postingan

Frame tops

| 0 komentar |
Sunday 16th December 07


I also managed to fit the backing strips to 4 roof tops for the forward cabins and fit them.
The frame dimensions here are critical as they make the final sizes of the sides of the boat up front. clamping and tecsioning the side frames to within 1mm of the correct dimension took some time but they are all perfect.


Front cabins roof.
Note the little slots all lining up perfect.


Im very happy with todays progress, and once the stringers are tacked in correct places the side walls are going on over christmas.

Tomorrow (Monday) aft frame stiffeners and more roof bits.
Read More..

New Genset Frame

| 0 komentar |
This is the new frame I have made to do 2 jobs. 1st job is to support the rear of the engine. Previously the 230v alternator body did this. The new 12v alternator isnt designed to do this


This doesnt look much but it took several hours of head scratching and trying different things. There was 2 main problems / considerations in the design. The 1st and most important was the maintain all the original parts so it could be put back to original. 2nd, I wanted it all to fit back in the original sound reducing box.  The other minor problems were to ensure access and use all the original bolts and the exhaust pipe route got in the way. The final consideration was to ensure the new alternator could be fitted and removed as the pad mount lugs are wider than the diameter.

The pads of the alternator will sit flat on spacers on top of the flats of the bottom angle irons and bolted through 
Read More..

10 Simple Steps to a Boat Frame

| 0 komentar |
When I read other boat building blogs, Im always a little embarrassed for myself. Other builders shops are so clean, their joints so perfect, the tools shiny and brand-name. You wont find much of that over here on Building Luna. As mentioned earlier, I have a rather down home (see Urban Dictionary) boat building style. I still feel pretty unsophisticated in the world of boat builders.

On the bright side, I guess I dont allow myself to feel intimidated by all the builders doing stuff the "proper way." This isnt rocket science. Take, for example, the frame I built on Monday (the last one!!):
Step 1: This here is the frame building table-- just plywood underlay screwed to an IKEA platform bed frame that my mattress used to be on. The mattress has been on my bedroom floor for the duration of frame construction-- the likely cause of my many intimate encounters with insects over the past 6 months (see Giant Millipede Incident of 2012)


Step 2: Draw in the frames using measurements from the table of  offsets. Note roof tar, sawdust, and regular dirt dust. 
Step 3: Screw some blocks to the table at your frame lines to butt the frames up against. Most plans are drawn to the outside of the planking.  These blocks are the width of my planking so I dont have to worry about that detail while assembling the frame. 


Step 4: Get frame lumber. I milled the 2 x 4s needed for the frames out of this gorgeous 8/4 rough rift sawn white oak that I snagged for cheap in Austin. 

Step 5: Cut the frame lumber. The angles at the butts are easily taken from the lines drawn on the table. Note from the picture in Step 2 that the bevels on the frames are sawed before assembly. I took these angles from the lines plan. While they are probably "shallower" than what Ill need, itll make beveling the standing frames less of a pain.

Step 6: Soak the joints that will not be glued with copper napthanate.

Step 7:  While I do make some effort to get the joints to fit nicely, Its not important to me to get them perfect where no one will see them. I smear them with roof tar.

The poor boat builders dolphinite. $27 for a 5 gallon bucket.
Step 8: Smoosh the butt joints together and liberally apply a waterproof adhesive where the gusset will go.
Step 9: Temporarily screw on the gussets while the glue dries (the screws will later be replaced with bolts).
Step 10: Screw on some temporary cross-braces to make sure the frame maintains its  shape until the planking goes on. Done!

Actually, this probably wasnt the best frame to document here on the blog. Its construction was a bit atypical. Normally, gussets go on front and back side of the frame . Initially, they get clamped on and holes are drilled through the whole thing for bolts. Then everything gets diassembled, and glue is applied to the gussets. Finally, the whole thing is bolted together and cinched tight. Still pretty easy peasy.

The frame shown above is different from the norm because the floor at this particular station is high enough that it will serve as the gussett on the back side of the frame. I temporarily screwed on the front-side gusset until the frame gets clamped to the floor, then Ill drill for bolts when I know exactly where the floor will hit the frame.

Cant wait to add it to Lunas growing body!


After I finished building the last frame, I marked all of the frame gussets where the chine notches need to be cut with a handsaw.
Im hoping to convince Ramon to make this job part of his daily workout.


Its nice to know that even the professionals sometimes make do with what they have.
Read More..

A frame goes up and an auspicious arthropod goes down

| 0 komentar |
Frame 5 is the first to go up!
Floor 5 was situated about a quarter of an inch too far aft. One solution (and probably the proper solution) would be to replace the floor. I just shaved a quarter inch off of the timber real quick with a Skillsaw and chisel. Ramon was my hero in making it plumb with the plane when I got too frustrated to continue.

Treating bare wood with copper napthenate preservative.


And shes up! Three 3/8" bolts on each side. All wood-to-wood contact surfaces were soaked with copper and bedded in tar.


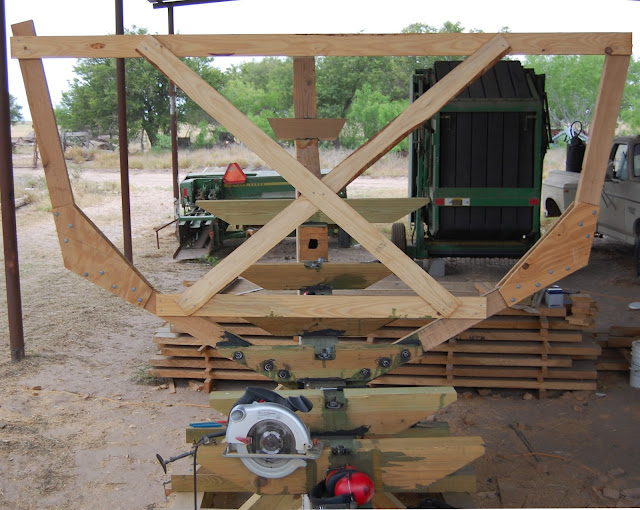
The "X" bracing and the cross beams at the sheer and just below the chine are temporary bracing.

Not the neatest job, but shes strong and deadly to fungi.

The first frame went up last night after a bit of a boat hiatus. Some coaxing with a Skillsaw and chisel got the frame to where it was supposed to hit the rabbet. Its nearly plumb, too. I apparently did a horrible job installing the floors, as three or four of them are not plumb nor flush with the station lines drawn on the keel. Ill be spending a lot of time over the next few days correcting my mistakes with a plane. This part of the boat building process has become tense as I anticipate bending a batten around the chine for the first time. I hope Luna will be beautiful.

Lucky for me, the universe sent me an auspicious sign this morning to calm my nerves.

I woke up at about 4 am this morning to a smelly, wet substance on my arm. I flung on the lights and, without my glasses, saw a blurry yellow puddle with a long, black swirly piece of business on my sheets where my arm had been. My mind immediately thought rats!, as I do have a history of sleeping in places were rats attack me in the night. Given this, and the series of rabies shots that followed, I am deathly afraid of rodents. I decided that, judging from the size of the mess on my bed, this rat had to be HUGE.  I frantically called Ramon to come over.

When I went back into my bedroom the turd was gone! I decided the rat must have come back and eaten it. I freaked. I had a monstrous, shit-eating rat in  my bedroom. I noticed a dark blurry mass moving slowly toward the corner of my bed. Rather than get closer, I decided to get out of there and start doing internet searches for, "feces consumption in rats," worried that there was a correlation between this behavior and rabies. Very productive.

When Ramon arrived, bleary-eyed and sweet as could be, we searched my bedroom with no luck. Ramon suggested the turd was in fact a culebrilla and that there was no rat. I was somewhat comforted by this possibility.

Culebrilla-- apparently common in the Valley, though sightings are rare.
But still-- the smelly yellow stuff made no sense. I resorted to Googling things like, "fat worm smelly yellow liquid" and finally came up with this:
A giant millipede! When stressed or injured, they secrete a pungent yellow substance that contains hydrogen cyanide. We never did find it, and these things live for 5-10 years. There was a lot of yellow stuff though, so one can hope it was fatally wounded. Ah well. Despite the long-lived monster spewing cyanide in my bedroom, I did sleep a little sounder knowing it wasnt a rat. 

The the silver lining in this early-morning fiasco? Apparently millipedes are good luck. Perhaps the chine will be fair after all.
Read More..

Building the RSJ Frame

| 0 komentar |


In August we built the Frame to build the boat on,


Steel supplied locally and built on our own steel deck staging as we havent level ground anywhere.


Read More..

Plywood on frame boat plans

| 0 komentar |
Plywood on frame boat plans Chris Craft Model Boat Plans Fishing Boat Plans Plywood Ocean Pointer Boat Plans One Sheet Skiff Boat Plan Skin-on Frame Kayak Building Jig-dsc00480.jpg
Read More..

Skin on frame canoe plans

| 0 komentar |
Skin on frame canoe plans Sean hartman�s lashed skin on frame canoe | intheboatshed.net, Sean hartman's skin on frame canoe sean hartman found plans for a skin on frame canoe (sof canoe) taken from an old book some time ago. he writes: 'i Siskiwit bay skin-on-frame sea kayak plans, Yost-style skin-on-frame free kayak plans. this british-style design
Read More..

Info Canoe frame plans

| 0 komentar |
Topic Canoe frame plans welcome here i have experience and you can take a benefit from here this about Canoe frame plans from another source Skin boat building kits, plans and how to build a, Boat building courses, skin boats, canoes, kayaks, rowboats, boat building plans, instructions, kits, materials, classes. everything you need to build your. Duck boat plans -
Read More..