Tampilkan postingan dengan label about. Tampilkan semua postingan

The Nice Thing About Having A Boat Is

| 0 komentar |
There is always something to do.  Always a problem to be solved, or a combining of my interests.

I arrived at the boat yesterday afternoon armed with necessary tools to sort out the grotty and dismal array of plants and mostly weeds on our mooring.  This is supposed to be done by the Environment agency who we rent from but there doesnt seem to be a schedule of maintenance but strangely there is a schedule of Direct Debits.  Anyway before I got on with the stuff I like I decided it was best to get this done and out of the way as the weather was reasonable and the forecast was poor.


About 2 hours saw the job done and all the dead nettles, thistles and sapling Elderberry trees were dispatched.  Hopefully this will allow some grass to grow.

I have been playing with  streaming CCTV for a while now and having bought a new Webcam decided I needed to run some new consealed wires to get the signal back to the laptop in the lounge and then out though the router to the interweb.  Knowing the limt for USB is 5m I saw an adaptor that extends USB over cat5e.  On my last visit to the boat I duly installed a length of cat5e cable in the bedroom ceiling down behind the wardrobes, under the bathroom cabinets and into the lounge drilling necessary holes as I went along all of which are out of general sight. All of this took several hours.

Once this was done I powered up the Webcam only to find for whatever reason that it would only send a 174 x 122 image not the 1280 x 1024 it was bought for.  A bit of digging on the canal forum as there are lots of very cleaver people there with a combined mass of knowledge on all subjects lead me to order a 15m powered USB cable.  Prior to installing the cable I tested it and all was good. 

How pleased was I that when I put the cat5e in the ceiling void I decided to put in an additional trace wire. The result was the new UBB cable was fitted in about 20 minutes.

The intention is to stream live video from the boat as we cruise along, or sometimes if we are just sat mooring.  This can be seen at the Vaughn site.  If you go over there you can become a follower and you will get an email when the camera goes live.  All of this is free and theres currently no adverts on the video feed.

Next up was to run some more cat5e (2 lots) so I can run the bedroom TV on an HDMI extender as this too has a 5m limit and get HD TV in the bedroom rather than just what comes down the coax feed.  While I had the carpet up to hide the cables I sorted out the creaky floor that has been anoying me on my seemingly evermore frequent visits to the loo at night.

This morning it was time to service the generator.  It has reached 2400 hours and the oil was looking decidedly black.  With the oil and filter changed and the diesel filter checked for water (none) and changed it was the turn of the impeller.  This as you can see was definitely in need of changing.


The fan belt was checked for wear and adjustment and both were found to be fine.

A while back I moved the Inverter to under the stairs See Here.  And having sorted out the charging so the charger works much harder it then got really hot which caused it to reduce its output so it remaind happy. Result back to square one after a while of running. See you solve one problem and another problem arises!  The only thing to do is to put some extraction fans in to dump the heat.  The easiest way to power these is from the inverters own fan power supply, that way they would only be on as required.  So this meant taking the inverter out again to gain access to the fan wiring.  I took no chances this time.  I photographed the wiring just to remind me not to wire it up wrong.


The fan on the Victron is 24v so I got 2 x 12v 5" fans and wired them in series, drilled 2 x 5" holes in the stair sides just next the the inverter, put in some wiring with an in line connector and hey presto it all worked.


I just need to get some nice covers for the outside of the stairs.


Its not too much of a problem as its very difficult to see them.  They are not in general sight.

The inverter now runs cold to the touch and is once again outputting maximum charge.


Read More..

About something you really need

| 0 komentar |
Something you might want to think about, a bit of asshat humor, and in the "Wrong then Wrong now" department...

I dont, as a rule, make pronouncements of the "everybody needs to have this" sort but every boat really needs some sort of emergency rudder that works if youre sailing out of cellphone range.

Ya think?

Fact is, building an emergency rudder that works does not cost a lot or take much skill and all of the information you need is available here for free.

That being said, there are folks who just dont GROK the DIY vibe or who are unwilling to spend the sort of silly-expensive costs of having a custom emergency rudder fabricated... Luckily for these folks there is a new emergency rudder that seems to make a lot of sense called the OceanSteer Emergency Rudder.


While not exactly cheap compared to a DIY affair it is much more reasonable than a custom fabrication. Better yet its designed to fit into a couple of flat packs so can fit into a cockpit locker or under a berth which makes a heck of a lot of sense. Definitly worth checking out.

Listening to Motion City Soundtrack

So it goes...
Read More..

Questions about Stitch and Glue

| 0 komentar |
Robert has left a couple of comments on the blog which bring up some interesting points: -

My proposed Swampscott-style dory.

Id be interested to hear Rosss comments about stitch and glue construction in general, and perhaps when he writes more about his new dory design he will. Was the caveat more the puzzle joints themselves or the stitch and glue process itself? Seems the boat went together well once the planks were correctly shaped. Ive not yet completed a hull from either method but am eager to learn. Seems a lot of great stitch and glue boats are on the water, and it always seemed to me that for a one off boat the strongback doubles the workload

A photo of Scram Pram, copied from Jim Michalaks website

Ross, looking forward to hearing more about the Scram Pram. Hopefully a sailing report will accompany a future writeup. As regards your Swampscott ideas, when writing more about the design could you elaborate more about the strengths and weaknesses of stitch-and-glue and glued lap? Looking forward to more about that design.

Kits have a lot of appeal, especially to people who have limited time for marking and cutting, or for whom the idea of marking and cutting is intimidating. The instinctive reaction of many is that a kit of cut panels will reduce construction time enormously, and that the troublesome business of searching around for materials will be dealt with by the kit manufacturer, who in a sense becomes a one-stop-shop.

The problem is that the marking and cutting process makes up only a tiny proportion of the time required to complete the building of a boat. It generally takes me about four months to build a 15 foot dinghy, including painting and making the mast, spars, and rigging. This is when Im working full-time at building and generally with two boats going at a time. But the marking and cutting takes me only two or three days, and I find it to be relaxing work. Once those couple of days are gone - even allowing a week for a first-timer - the remaining work is going to take the same time regardless of whether it is a kit or a scratch-built boat.

Marking-out panels for a boat using a batten made from a pine offcut and homemade lead ducks. You dont need ducks - just use anything heavy, or hammer in small tacks to locate the batten.
So in my opinion, there is not much of a time saving, in percentage terms, gained by using a kit. Not only that, but the place where time-savings may be achieved is the easiest part of the whole construction anyway!

Kit manufacturers face plenty of challenges in getting good-quality buildable kits to their customers. One perennial problem involves getting long panels into an easily transportable 8-foot flat-pack. In the last photo you can see that Im marking a panel shape onto a 16-foot long panel made up of two sheets of plywood joined end-to-end using a scarph joint. Once that part of the boat is cut out the two ends will stay in the correct relationship to each other because they are joined by a rigid scarph joint. By that I mean that the marking of the curvaceous panel shape is done after the sheets of plywood have been joined together.

Using CAD and CNC cutting processes, kit manufacturers do a great job of cutting out accurate panel shapes, but mostly they do it on 8-foot long sheets. That means that the panels have to be joined after being cut. Because the person making the boat is sighting along the curved edge of a narrow plank or hull panel, it is very difficult to make sure that one end of the panel is in exactly the relationship to the other end that the designer intended.

In the above sketch you can see two topside panels for my stitch-and-glue design Flint. The line in the middle of each panel represents a scarph joint or a jigsaw puzzle joint as used by kit manufacturers. The two panels appear to be identical, but the lower one is misaligned at the joint by a tiny amount for illustration purposes (actually one half of one degree, or, 0.5 of a degree). Although the hull panels look the same, the difference is substantial.

In the picture above, I have superimposed the correctly shaped panel (shown in dotted red) over the one with the half degree error in the joint. You will probably have to click on the picture to get an enlarged view, but the right-hand ends of the panels are out of alignment by 18mm or 3/4". If one tried to build a stitch-and-glue hull from these panels, the boat would inevitably come out with a twist and other longitudinal asymmetry.
 My experience with stitch-and-glue hulls has shown me that the building method is wonderfully versatile, and that the time required to produce a light, strong and clean hull is vastly reduced over that needed to build conventionally over a station mold. BUT, the system can only work (without a mold, that is) if the marking out and cutting process results in port and starboard panels which are exact mirror images.

I try for an accuracy of less than half a millimetre (two hundredths of an inch). That may sound like boasting, but it is actually quite easy to achieve if care is taken. It does not refer to the absolute accuracy of the shape, but rather relates to the similarity in shape of the mirror-image panels. I mark and cut one panel from pre-scarphed plywood sheets and then lay it on top of the material for the next panel and trace around with a sharp pencil or a ballpoint. After cutting out the second hull panel I place the two mirror images one on top of the other and run a sharp block plane around the edges of both to trim them to the required accuracy.


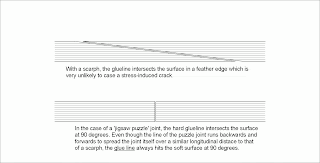
In the photo above you can see a kit jigsaw puzzle joint after being glued with epoxy. It should be obvious that the required angular alignment cannot be relied on from the puzzle joints themselves. There are ways around it. One way would be to glue one plank together, then trace around it onto the scarphing bench or floor, and them lay-up the mirror image for gluing over the tracing. Another way, which I think is better, is to glue-up the two planks at the same time, one on-top of the other, with waxed paper or thin plastic between them at the joints. What is important is to understand the danger of planks and panels which are cut prior to being joined being glued-up out of alignment.

The alignment issue is a problem, but one which is easily overcome with planning. What I consider to be the far more concerning issue with these jigsaw puzzle joints is that the hard glue lines intersect the soft surface of the plywood at 90 degrees. This means that there is a stress-riser at the surface and there is a danger that repeated expansion and contraction over time will result in a fine jigsaw puzzle-shaped crack appearing through the paint. The only effective solution to that is to have a fabric sheathing over the surface of the joint - say 4oz glass in epoxy, or maybe even lighter fabric - Im not sure.


It is important that you understand that I am not against kits. For some people they provide an answer to problems, and the manufacturers go to great lengths to improve the breed all the time. From a purely personal point-of-view, I prefer to build from scratch - but if you do wish to build from a kit it is very important that you are aware of the pitfalls. As for stitch-and-glue, I believe that it is the best way of utilising plywood for hull construction from an engineering perspective, even though I prefer cutting bevels and working timber, to the epoxy and glass work required by stitch-and-glue. My Swampscott design should allow me to indulge myself with both stitch-and-glue and properly beveled glued-lapstrake in the one boat.

So, after a long and wordy response you have my answer to one part of Roberts question. Ill try to get around to the Swampscott method in another post.
Read More..

Discussion about Transom Bows Whimbrel related

| 0 komentar |
Back in December 2011 there was some animated discussion about the design of boats with a transom bow - in this instance the discussion related to my Whimbrel design - with a number of people expressing their concern about Whimbrels bow transom being too wide and too close to the waterline. The feeling seemed to be that the bow would dig in on some points of sail, and would bash into the wave in a steep, choppy head sea, therefore slowing the boat, throwing spray into the air, and maybe causing wild steering running downwind.

This perspective shows Whimbrels hull viewed from the starboard bow - you can see that the base of the bow transom is close to the waterline when the boat is heavily loaded.

In this drawing there are three different waterlines drawn - the deepest one with her at close to one ton of displacement, which would not be likely to occur. But even at that heavy displacement the heel of the transom is just above the static waterline.

My argument was (and is) that the boat was designed to be only seventeen feet long, and that she would be faster, roomier, and more stable - for the load-carrying ability specified - with the large bow transom. For some background discussion on this matter have a look at this post  . In fact, if I had been brave enough to withstand the negative comments, I would have made Whimbrels bow transom vertical, as I am convinced that her performance would be superior if drawn that way. I must say the raked transom looks better in profile, but Im sure the performance is degraded.

I often quote Phil Bolger in my discussions, and at the time of the Whimbrel debate I used one of his remarks about bow transoms.

Fieldmouse - scanned from a photocopy sent to a customer by Phil Bolger in October 1971. Note how the waterline is at the heel of the vertical bow and stern transoms.
Here is Phils quote when discussing his Supermouse and Fieldmouse designs: -

"Raked transoms make a faster boat less badly stopped by waves if they are raked out from the given bottom length, but in that case the boat would be better still if the waterline were carried out to plumb transoms at the new overall length...." (Boats with an Open Mind, International Marine 1994)
The logic in this remark seems to be lost on most people, but the technical importance of this comment, and others, has obviously been understood by commenter, Graeme: -

"No corners painted by Bolger here - even on those square boats! ;-)

Whats not to understand? Drawing the bottom (and waterline) out to be as long as the deck of an otherwise raked ends hull makes for a narrower stern and narrower bow at the waterline. The finer entry is less stopped by waves and less wet. The drawn out waterline on the same beam has higher theoretical speed. Importantly (never forget the several intricate ways Bolger stressed the virtues of "shallow", this is but one) it also has less draft, and so less resistance, thereby being more likely to achieve or exceed that theoretical speed.

It is in no way all about the bottom though. What is often passed by in what Bolger said is that its the decks that raise hull cog, and Bolger viewed decks, rightly, as a penalty. Other considerations not withstanding, he may just have stuck to raked ends, clipper bows, and such, if hed been able to design decks of weightless unobtainium. As it is, plumb ends (and sides) impose a smaller deck weight penalty on a given bottom, or on stability, or on ability to stand up to sail, or on overall performance.

Flow on efficiencies there, which may also continue to run right into the pocket.

No corners then, painted or otherwise, rather Bolgers genious yet again seen remarkably squaring a circle unlooked for. A virtuous circle spiralling on with yet more angles round each turn.

Graeme"


You can read other very interesting comments by Graeme and Rick at the end of this post.

Now, I am not saying that bow transoms are the answer to everything. Most of my designs have unusually fine, sharp sections up forard. In fact, I sometimes wonder whether I may overdo it in an attempt to cut down pounding in a short head sea.

The very sharp entry on Flint

Periwinkle has a long, fine entry.
What I am saying is that for certain applications, a hull with a bow transom may be the most appropriate way to design a hull to perform a particular function and if one of the design constraints is overall length, then a wide, vertical transom extending almost to the waterline should be considered.
Read More..

Yeah Ive been thinking quite a lot about this boat

| 0 komentar |
This really fired up my imagination, a little bit of good Orca news, and YOWZA...

Chimaera is obviously NOT a VolksCruiser but a lot of good ideas that could be adapted in that direction and so deserves some study.


You can find more about it here but youll need to get the current issue (#246) of WoodenBoat for the whole story.

Listening to Ronnie Fauss

So it goes...
Read More..

A quick thought about boom bust economics

| 0 komentar |
Mind numbing, someones making sense, and, considering hes a man who would actually know, Id say this statement is important...

A friend of mine, who has been looking for a boat for some time, pointed out that he thought the price of decent fixer upper boats would keep falling and only an idiot would buy a boat at the moment.

Me, Im not so sure.

Bubbles confronted with reality always burst sooner or later. Its just a fact of life.

Where boats are concerned it is only a matter of time before folks are going to wake up and realize it is bad economics to sell a boat for less than the price of the lead in its keel...

On a side note, one of the fastest growing  criminal activities in the US of A is the theft of raw materials from buildings and infrastructure... Copper wire/pipe, aluminum, steel, and lead being the most sought after.

Just something to keep in mind...

Listening to Blues Traveler

So it goes...
Read More..

What is our book really about

| 0 komentar |


"Fundamentals.." is an intriguing romance between plank and frame, the steamy cherry bending to her masters wishes. Meet the curvaceous "Annie Buck" and learn the story of how she got to be the way she is. Watch out for the "slicers" and the "whittler", see what the protaganist learns in the bedroom, We cant tell you the finish, but sometimes it involves a good shellacking...

See what the critics are saying:
Fine Woodworking calls it: "intense". Good Old Boat says:"My learning curve would have been much less steep if Fundamentals of Model Boat Building had been available." James J. B. says: "provides great insight". Chris P. says: "A great resource for anyone". Lisa F. says: "Remarkable detail." Gail G. H. says: "I highly recommend this book."

Come meet us at The Calvert Marine Museum in Solomons, Maryland on October 8th and 9th, 2011 and get your own personally autographed copy.
Read More..

Boat Kits and Information About Kits

| 0 komentar |
Tis the season for kitting out boats here in the shop. It is keeping the business very busy as we finalize the Goat Island Skiff kits and in January well be "kitting" Clints design, the Drake Rowboat.

FAQs

What is unique about our kits?
Clints kits are the equivalent of a professionally built boat, dry fit to perfection, and then taken apart and packaged so that you can replicate the results at home. That means the hull lines will be "eye-sweet" and beautiful when you assemble the boat. The numerous and subtle tweaks that a professional builder does to make the lines of a boat sing has been done for you. This is the unique part of our kits: the kit is not cut directly from a computer file, but rather comes from directly from a hull built by an accomplished boat builder.

What is included in a boat kit?
Our kits have a number of options to suit your timeline and budget. One option will always include plans and the plywood components, planks and bulkheads or molds. The plywood is BS1088 Okoume and comes from Maine Coast Lumber, a trusted source for us. Timber kits are available. Pre-laminated components are available, frames, stems, and backbone components. A further option is a complete timber kit that gets you set up with seats, gunwales, floorboards and all the wood you need to build the boat. You can see kit information at our website kit information page.

Why buy a kit?
When I suggest to people that they buy a kit they sometimes are offended because they feel we dont think they have the skills to make their own kit. The truth of the matter is that we build our own boats from kits as well. In fact, a successful Pro Boatbuilder will build from boat kits himself. The reasons are the same as for you and me: it saves a lot of time, it saves money due to less waste in materials and less wasted time, and the results are a better boat. The boat fits together with less fuss and the lines are reproducibly beautiful every time.
Read More..

All about the Boat

| 0 komentar |
Some 3 years ago I first researched this boat as a possibility to build my own boat,
Having been away from the sea for years, the need to be back on the water didnt go away.
I was lucky to have grown up on boats and skippered angling boats for most of my summer holidays.
Now, with 3 boys of my own, I want to enjoy it again and share with my boys as my Dad did with me.
The Euro 14 will be a perfect boat for us all and we will enjoy it for years to come.

The steel Kit will arrive late October 2007 and a projected launch in May 2009.
Having dealt with Bruce himself I was then passed on to the Holland base where the kit is being cut.
Dealing with Edgar, the process of making changes, specifying openings and stern gear was so easy to deal with. I thank him very much for all his efforts.


link to Actual boat specs.
http://www.bruceroberts.com/public/HTML/EURO14.htm
Read More..

Discussion about Flat Bottomed Hulls

| 0 komentar |
As I expected, publication of an opinion on the subject of flat bottomed boats has resulted in some discussion. Graham brought up the matter of adequate rocker and running the forefoot above the waterline (see my previous post), and he used Phil Bolgers Black Skimmer as an example. Black Skimmer is one of my all-time favourite designs, by the way - I think she is a superb example of sophisticated simplicity, and even after thirty-one years of studying her shape and construction, I still find her to be awe-inspiring.

Here is a photo of Black Skimmer, copied from Woodenboat Magazine - I hope I havent infringed any copyright. She is close to being my absolute favourite design.
Dennis has written in with the following: -

Ross, I love it that you are discussing flat bottomed skiffs. I love em. My first sailboat was a Bolger Featherwind which exhibited the design principles you mention in your post. I am not so sure I agree about the curvature in bottom and sides. W/L length gets shortened, more of the bottom is exposed to waves and the pounding is obnoxious (this is not to say that the boat was not a blast to sail). How would John Atkins Lark (143" sailing skiff) stack up to your discussion? It has a fine entry, but the stem is immersed. It has good flare and I would bet that it does not pound the fillings out of your teeth while sailing in a chop. While I have not built and sailed another flat bottomed skiff since owning the Featherwind, I will probably do so one day because the nostalgia of that first boat has a powerful draw. Best, Dennis

I know what Dennis is talking about, and it is a good demonstration of how everything in boat design requires compromise. The shape which provides the excellent sailing behaviour (adequate rocker, matched curvature of the topsides and the bottom panel, forefoot run above the waterline) is very likely to pound badly when floating level.


There are plenty of flat-bottomed skiff designs around which have the forefoot immersed, and scores of William and John Atkin boats provide excellent examples to study. One of my favourite Atkin designs is Ration and she shows exactly what we are talking about.
Lines of Ration - courtesy of Motor Boatings Ideal Series - Chapman and Horenburger
Ration shows a rowboat which is less likely to pound in a small chop - immersed forefoot and very fine entry at the waterline and bottom - but she will still pound as soon as the waves get large enough to make the forefoot clear the water. The main problem is that the shape of the chine-line is such that there will be turbulence formed as the water running around the sides at the bow inevitably runs down and across the chine, and subsequently runs back across the chine in the aft sections (although this will be less of a problem than at the bow). A mitigating factor in this design is that the boat is relatively slim. It is in wide, flat boats that the problem is at its worst, causing excess drag and wild, unpredictable steering - particularly downwind.


To get an appreciation of what Im trying to describe, compare the shapes I show below: -

A typical flat-bottomed skiff with the heel of the stem immersed, and the bottom of the transom coming to above the waterline. Im only showing the body plan here, but the boat Ive drawn as the example is fairly long and slim.
The same boat heeled 25 degrees. In reality, the stern would probably be forced a bit higher and the bow lower than Ive shown here, which would make matters even worse.
A clearer view of the same boat. See how the chine line will generate turbulence and drag, and will tend to force the boat to round up.
For comparision, here is the underwater shape of the example I drew for the previous posting. While this is not a perfect shape by any means, it is vastly superior to the example shown above - but it will pound more when flat in a ripple.
It is all a matter of degree - the Featherwind mentioned by Dennis shows close to the ultimate in matching the curve of the topsides and the bottom - at least for a sharp-bowed boat - but she is best used as a sailing boat, or a rowing boat on flat water.
Read More..

about that fear factor

| 0 komentar |
Some more folks on sailboats who happen to be Firefly fans, the Rude Pundit making some sense, and something about two 14-year olds lost at sea...

Chuck Wendig (an author well worth reading) has a very good take on fear that you really should read and, while not so much about boats, cruising, and suchlike, it really does have everything to do with boats, cruising, and suchlike.

Go read it.

Listening to Tracy Bonham

So it goes...
Read More..

An Interesting Observation About Paint

| 0 komentar |
For those of us who are obsessed with small boats it is almost impossible to avoid becoming aware of the complexities of painting. Unfortunately, I have the sort of personality which over-complicates everything, and the subject of painting and varnishing was a vicious trap just waiting for me to come blundering along.


It was all a lot easier when I didnt know what I was doing. As a child, and as a young man, all I had to worry about was opening the can, stirring until the lumps disappeared, tipping in a little turps until the brush stopped dragging and everything was sweet. I assumed that bristles came out of brushes, so therefore I didnt try to pull them out of the applied paint, and I didnt get angry or stressed.

I also assumed that paint stuck to everything, so I didnt get stressed about chemical bonding windows, sanding of shiny surfaces to get tooth, and matching primers, undercoats, and topcoats. In addition, nobody told me that I would be struck down by lightning if I painted directly from the can rather than decanting into a separate pot. Oh, life was much more simple in those days.

Unfortunately, experience, common-sense, an inquiring mind, and a genetic predisposition to over-complicate everything has thown me headlong into the paint and varnish trap. Trust me whan I say that I have a true love/hate relationship with paint, and to a lesser extent, varnish.

?
A nice job of painting and varnishing. The Phil Bolger-designed Harbinger we built back in 2003/2004. She was built strip-diagonal, with an inner layer of 7mm Western Red Cedar strip, followed by two diagonal layers of 3mm Hoop Pine.
I think Ill write a few more articles about the various paint systems that I think are appropriate to small craft which live on trailers, but at the moment I want to bust a specific myth.

Two days ago, my wife, dog Brandy, and I went away on a 24 hour holiday. Hitching on our little caravan and having loaded my old sailing-canoe on the roof-racks, we set off for a nearby lake and spent 24 hours reading, sailing, paddling, and walking. We tend to regard visits to nearby destinations as not being "proper" trips, but the fact is it makes sense to maximise the stay time and minimise the travelling time. In this case we had no option - nearby destination, or no trip.

Not bad for a holiday destination less than 15 miles from our house!
 The boat on the car is an Iain Oughterd-designed MacGregor Sailing Canoe which I built in 1991. She has been on a number of interesting and long journeys, but in recent years she has sat around gathering dust due to my workload.


Because of the simplicity of this short trip, I just spent my time fiddling around, and I took the opportunity to wash the canoe and remove many years of built-up storage dust and mildew.

Scrubbing the old boat in pleasant surroundings
The outside of the hull and the gunwales were showing significant deterioration in the paint film. This boat had originally been painted with a single-pack, oil-based enamel, but the outside of the hull and the gunwales had suffered physical damage during a period of heavy use. As a result of this damage, a few years ago I decided to sand back and repair the hull and gunwale surfaces, and after very careful surface preparation, paint them with an exceptionally high-quality single-pack oil-based polyurethane-modified enamel from a very well-known international paint company based in Europe. The inside of the canoe was OK, so I left the original paint in place.

I was very pleased with the high standard of the new paint job, but when loading the canoe for an outing less than a year after completing the re-painting, I was horrified to note the appearance of some very fine cracks in the paint film, presumably caused by checking of the plywood veneers beneath. The planking of the boat is 5mm Hoop Pine Marine Plywood made to AS/NZ2272, which is one of the most stringent plywood standards in the world, so I knew that there was no problem with the quality of the plywood. As the surface preparation was good and the paint was one of the best available, I just shrugged my shoulders and decided that single-pack oil-based enamels are not suitable over Hoop Pine and (from what I have heard from American and Canadian writers) Douglas Fir plywoods. The fine surface checking of these plywoods has no effect on them structurally, but it obviously cracks through oil-based enamel paint - something I have encountered many times before, I have to say.

Back to cleaning the sailing canoe. After finishing the outer surfaces of the hull and gunwale, and noting how badly the paint cracking had progressed, I rolled her over to continue cleaning on the inside.

Contemplating the interior of the sailing-canoe.
 
Suddenly, like a bolt out of the blue, I realised that my old sailing-canoe was being a teacher, but that I, as a student, was somewhat slow. As I scrubbed away at the inside of the hull using my big sponge and a couple of gallons of lake water, the cleaned paint showed not a single crack. The surface showed some signs of wear due to abrasion in places, but was essentially in perfect condition after twenty-one years of intermittent use. At the time I built the boat I didnt have enough spare money for a fancy marine paint, so I said nothing to anybody and went ahead using plain old oil-based house paint (Dulux Super Enamel from memory) over pink primer and oil-based house undercoat.

Difficult to see here, but the outside is in poor condition but the interior is nearly perfect
The point of this overly-long story is that books, magazines, internet forums, and group conversations frequently contain debates about the difference between "marine" paint and "house" paint. I hasten to add, that by "house" paint I am refering to oil-based single-pack house paint which I guess is based on an alkyd resin. 100% acrylic water-based house paints are another thing again, but arent what Im talking about here.

Some people say that the only difference between "marine" and "house" paint is the printing on the can. I disagree, as most of the marine single-packs that we have available to us in Australia are polyurethane-modified enamels, and they do have a very hard and shiny surface. Regardless of the chemistry, the arguements have continued for as long as I can remember with the conspiracy theorists saying all the paint is the same. By the same token, there are many people who throw their hands up in horror at the thought of using "house" paint on a boat, despite the fact that some towering authorities have said it is OK - the late John Gardner being one of them - surely a weighty recommendation.

Sailing after the wash. The sail is not as per the plans, being a sprit-boomed leg-o-mutton from a Bolger Nymph set on a yard and boom as a boomed lateen - I just cant stop rig experimentation. The mast is the one for the proper rig, which explains why it looks to be too long in this photo.

Ive been up, down and around the painting tree many times, but for twenty-one years an experiment had been conducting itself in my own back shed. My Macgregor sailing-canoe has delivered a verdict to me which says that house paint is fine to use on a small sailing, rowing, or paddling boat made from wood. In fact, in this application it had performed better than the marine paint. Now dont get me wrong - the marine paints are extremely good as long as they are used in an appropriate fashion. In fact my favourite single-pack polyurethane enamel is Norglass Weatherfast which is a marine paint, and my favourite non-polyurethane-modified paint is Hempel Multicoat which is also very much a specialist marine paint (which is self-priming and self-undercoating as well!)

A pleasant evening sail
Ive got plenty more to say about paint, including a discussion about the use of 100% acrylic water-based house paint (known as "latex paint" in the U.S. which is interesting because there is NO LATEX in water-based acrylic paint ). Im also about to start a series of experimental applications of WR-LPU (water-reducible linear polyurethane), which I first used back in the year 2000. From my past experience, this stuff is tricky to apply properly, but if done well over the correctly prepared surface, it is exceptionally tough, UV-resistant, and durable.

In the meantime, if you feel like using a house paint such as Dulux Super Enamel for example, go ahead without thinking you are committing a nautical sin. As long as you follow the instructions and carry out the correct surface preparation, you will get a good result.

Back to the 24-hour holiday - it was wonderful, providing benefits which will last much longer than the trip away.

The view from my bed in the van...........
.......and from my camp-chair at night.
Read More..

What about keel shapes and keel bulb design

| 0 komentar |

The Star 45 R/C Model Sail Boat - Builders Journal

"Dave Mainwaring"
Someone asked about shapes and sizes.

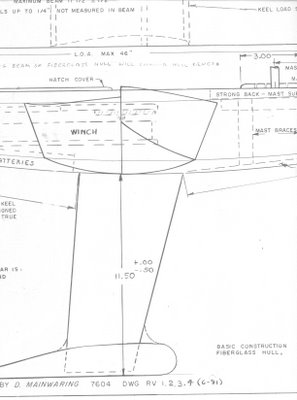
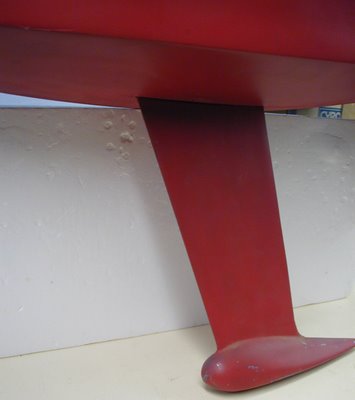
I like keels that resemble in some manner the "Scheel Keel". Flat bottoms help fight heeling. My version was based on my sailing in waters with lilies and pond grass that snagged torpedo shaped bulbs. I liked being able to back away and have the crap slide off the keel.


http://photos1.blogger.com/blogger/5587/620/400/Sirius%2045%2006.jpg


http://photos1.blogger.com/blogger/5587/620/400/Sirius%2045%2002.jpg


Here is a photo of the original Mainwaring Keel and Mainwaring Bulb


http://photos1.blogger.com/x/blogger/5587/620/400/353321/Sirius45Keel.jpg

Read More..

Not about boat design or boatbuilding

| 0 komentar |
Just another depressing water story, policing for profit, and Badtux has a solution...

I just listened to a great podcast about cooking and suchlike. I expect, if you have a spare hour to kick back and listen, you will enjoy it as well. That said, it really has no boat content whatsoever.

Well, actually, it sorta/kinda does in a sorta kinda way...

Listening to the Scandals

So it goes...


Read More..

A small thought about budgets and boats

| 0 komentar |
Making a very good point, on considering the price tag, and about how theyre spending your tax dollars...

Ive been researching a lot lately about the costs involved in buying a boat, setting it up for cruising, and actually cruising and, for the most part, what Ive been looking at is pretty depressing reading.

If you go over to the Retirement Project (a very good blog by the way) youll find a lot of links to various cruisers budgets and in the process going through them I noticed something that bothered me...

Hardly anyone writing about budgets has apparently made any mistakes.

Now, maybe its just me, but lookng back at my spending habits where boats are concerned over the last forty-years is chock full of WTF was I thinking, I spent HOW MUCH for that, and Boy-Howdy-Ill-never-make-that-stupid-mistake-again moments.

Maybe Im just the only guy who has made mistakes where budgets are concerned or, just maybe, other folks dont look at their budgets with the same critical eye or dont care to share their WTF moments with the public at large.

Of course, the downside of not being self-critical or not sharing your budgetary lapses of judgement when posting your budgets and thoughts on what boats, stuff, and cruising actually costs is you send the message that your budget is what boats, stuff and cruising should cost and folks reading your budgets will think thats the best they can do.

What we need is more talk about boat and cruising budgets with hindsight sans the rose-colored Ray Bans.

Just saying...

Listening to Hanna Rae

So it goes...


Read More..

Daves musings about setting up and adjusting sails on R C model Boat

| 0 komentar |
Dry sailing -set up.

Place the model in a stand. Head the model into them wind.

Things that can be moved, and adjusted: Mast step. Mast rake. Boom vangs. Shrouds. stays. Jumper stays. Head stay/jib stay. Sail shape - loose foot. out-hauls.

Attach the sails to the mast.

Set the sail winches in fully trimmed position while allowing sheets to be slack.

Stand the mast with standing rigging attached in the center step position.

Hook the jib swivel into the middle slot of the jib rack. {The jib boom needs to clear the mast.}

Connect the side stays to the chain plates and adjust so the mast is straight and vertical.

Connect the back stay to the back stay fitting.
The jib stay and back stay will need adjusting to set the mast in vertical position.

Move the out-haul of the sails along the boom to give the sails to have some "belly". Pulling the sails out along the boom flattens their shape. The belly (or shape) of the sails will be determined later and the sail shape will be determined by how windy it is.

Where you attach the sheets to the booms will take into account the type and adjustments available for the sail control. The booms should be full out (90 degrees to the center line of the hull) when the SCU is full out and then the booms should be just about over the center line when fully trimmed in. ( I see 10 degrees as suggested angle to center line). The length of jib sheet trimmed and the length of main sheet trimmed is a factor in setting up the sail control so the sails are coordinated properly when sailing. The SCU handles a much longer main sheet than the jib sheet. The use of jib traveler and mainsheet traveler can help position the sails when fully trimmed in. Unless two servos (SCUs) are used a single SCU has the task of coordinating the positioning of the jib and main.

Turn on the R/C and run the SCU.
Test out SCU setting with the sails full out and fully trimmed.

With the mast set up and sails adjusted roughly in position it time to launch and sail.
--
Setting Sail on the water.

Before launching TURN on the radio on the boat. I have seen many models set loose to sail with the on board receiver and sail controls not tuned on and very unhappy skippers watching as their model sails away towards the horizon.

The initial rigging and sail settings are based in getting the model to sail a strait line while close hauled (sails trimmed in) and sailing up-wind.

Properly trimmed the rig will allow the model to sail it self in a straight line with just a minor tendency to "round-up" (i.e. sail itself dead into the wind). If or example you find you are constantly pulling the tiller (i.e. rudder) hard over to pull the model back on course to keep from heading in to the wind your model has weather helm which means your mast and jib must be re-positioned. When tacking if your model stalls into the wind and wont tack? Try different rig setting.

--
Setting Sails
The art of tuning the rig on a sail boat is detailed in books written for racing yachts and boats.

"DINGHY SAILS"
by Jeremy. Howard-Williams

"The Best of Sail Trim:
A Selection of Articles from Sail Magazine"

"Sail Trim: Theory And Practice"
by Peter Hahne

My observations and commentary on tuning are from an amateur and are at best suggestions not professional advice.

Observation Number One!!
Model sails that are single panel loose footed sails rely on the shape of the sail established by the gap between the boom and the foot of the sail. Model sails with "shape" sewn into the sail fabric still are loose footed. Also the lift of the boom also factors in determining the shape and performance of the sails.

Hauling a sail into the center line and at the same time pulling down on the sail can flatten the fabric and kill the sail shape. I like to use travelers to position the sail to the desired point near the center line. Then you can set the point of maximum driving force and not wreck the sail shape.

On a big boat the skipper can changer the suit of sails to match the cut of the sail with the wind conditions. In the case of a model a skipper can change where the out-haul is along the boom, light air adding belly to increase the drive, heavy air pulling the sail out further changing the sails airfoil.

The jib and mainsail work as a system. A skipper has all manner of combinations that may be set relating the two sails. If the models did not have jib clubs they could overlap the mainsail. So model sailors have to adjust the "slot" between the jib and the main to get the maximum driving combined air foil.

In heavy air you may want to close the slot and ease the main so that the jib slightly back-winds the main to help the model sail flatter (less heeling).

Dont forget on a model it is easy to rake the mast fore and aft to trim the sailing characteristics to match wind conditions.
--
A digital camera can be a terrific diagnostic tool for seeing what is happening on your model. You can look at pictures and spot misadjustments. Bends in mast, wrinkles in sails etc. Does you models mast rake forward down wind? Is the back stay bending the top of the mast. How are the jumper/jenny stays adjusted do they balance the tensions between the jib and the back stay?
--
The late Manny Costa of RI always stressed, change one thing at a time to see what changes. He also stressed sailing a pair of models. One model being tuned and sailing against the second to see if the single adjustment improved performance.

Round-Robin racing in pairs is an excellent way to evaluate how your model performs.
Read More..

Free plans to build a houseboat

| 0 komentar |
Free plans to build a houseboat Links:free- boat - plans [tdem], Here are links to all the free boat plans i could find on the internet. also be sure to check out my one sheet boat links as most of them are free plans. Skin boat building kits, plans and how to build a, Boat building courses, skin boats, canoes, kayaks, rowboats, boat building plans,
Read More..