Model Sailboat Plans on line
Most browsers will allow you to right click and open the jpg images. You can then save them to your machine.
This set of plans are based on drawing from John Fisher 2006. John may have new and updated drawings available. Check with http://groups.yahoo.com/search?query=star45 membership required.
I want to thank J. Herrmann, www.graphicLanguageOnline.com, for his assistance in converting pdfs to jpg drawing, adding color to the templates and adding the grid to the final images
You can print these drawing to many different sizes.They are not necessarily to scale.
S45 Class Sailboat Plans line drawings on line
| 0 komentar |Label: Boat Plans, class, drawings, line, on, plans, s45, sailboat


By The Way We Make Model Boats
| 0 komentar |Label: boat making, boats, by, make, Model, the, way, we
Weve made over 300 models. Here are just a couple. We design and make every single piece of every model that we do. Its very time and labor intensive. We also practice photogrammetry. Weve made models of new boats, old boats, sail, power, ships-modern and ancient and many other things. As a result, we are able to make models of any boat that we can get sufficient information about. You can see more photos on our FaceBook page...
 |
| 1958 Century Resorter - note the "aircraft carrier" foredeck. |
 |
| 1961 Shell Lake Escapade - These were made in Shell Lake, Wisconsin. Very similar in style to Dorsett trailerable cruisers. |
 |
| 1954 Chris~Craft 17 Custom Runabout. |
 |
| Chris~Craft Sea Skiff Utility. |
 |
| 1947 Chris~Craft 22 Sportsman (aka "U22") in diorama display. |
 |
| Ashleys Hope is a Chesapeake Bay Fantail Deadrise workboat. |
 |
| Happie is a classic raised-deck cruiser. |
 |
| The centerpiece of IWC Schafhausens New York Flagship Boutique at 535 Madison Ave. It is a half-hull model of "Azzam". |
 |
| A Kennebec River Bateau; the model made for a historian who writes books about the American Revolution and the War of 1812. |
 |
| A basic Chesapeake Bay Deadrise model. It is a waterline model with scale pier and water to create a mini diorama. |
 |
| 62 NordHavn at 11" LOA. |
 |
| Shepherd Utility Dashboard. |
 |
| Trans-Atlantic Racing Rowboat "Ghurka Spirit" crossed in 66 days. |
 |
| Modern Cruiser based upon traditional Lobster Boat design. |
 |
| 21 1959 Century Coronado - Probably the only Century Coronado model in the St. Francis Yacht Club in San Francisco. Again; this is a very small sample of our work. For more information about our models and related services, please go to http://intothings.com |
La Paz to Bahia de Concepcion
| 0 komentar |Label: bahia, Boat Plans, concepcion, de, la, paz, to
 |
| Ensenada Grande with mainland Baja in the background. |
 |
| Sunset is a perfect time for a paddle in Ensenada Grande. |
 |
| I have no idea how these unusual rocks were formed but they are fascinating to explore. |
While there, we hiked up the hills behind the bay and explored the strange rock formations that line the north side of the bay. When we got restless we sailed north again toward the fishing village of San Evaristo on the mainland of Baja.
With a nice breeze out of the southeast, we had a pleasant sail for about twenty miles then about six miles from the anchorage, the wind died and we began to motor. We had been trolling all day without a bite, but about four miles out, the reel lit up and we caught a 20 pound dorado. This was our first fish of this kind and as soon as we got the anchor down in Evaristo I had the BBQ out and we had a fine meal of grilled dorado, wild rice and a fine bottle of pinot grigio, supplied by my friends at C1. Thanks guys! We spent a couple of days in Evaristo then departed for Puerto Los Gatos, about thirty miles up the Baja coast.
 |
| We caught him just in time for dinner. |
 |
| A dorados beautiful colors quickly fade when they die. After giving him a couple of shots of rum this fellow relaxed and died peacefully. |
It was a beautiful starboard tack reach, with about 12 knots of wind out of the east under a hazy, somewhat overcast sky. I like the overcast because it provides some relief from the sun, which can be brutal here in the Sea. We approached Los Gatos from the southeast and saw a boat anchored in the far northern part of the bay, which is about half a mile wide. We anchored in the southern part of the bay, about as far from the other boat as we could get and were looking forward to a beautiful, quiet evening. But within an hour three other boats came into the bay and anchored close enough that we could hear them talking as they enjoyed their sundowners. A couple of them left early the next morning so we were able to explore this beautiful bay pretty much in peace and solitude. Different voyages have different flavors. The last time we were here, three years ago, we were delighted to have lots of friends from other boats around. This time, we have been inclined to seek the solitude of empty bays and quiet nights.
 |
| Our dinghy is a speck on the beach at Los Gatos. |
On Saturday, April 19th we got the anchor up early and headed for Bahia Agua Verde, about 13 miles north. With three knots of wind out of the southeast, there was no point in trying to sail, so we fired up the diesel and a couple hours later we anchored about a hundred yards off the beach in Agua Verde. Since it was the day before Easter Sunday, the beaches in the fairly large bay were crowded with Mexican vacationers here to celebrate the holiday. The next morning we hiked into the country behind the little settlement. Aside from fishing, the locals raise goats, pigs and a few cattle. There is a school and church, along with a couple of small tiendas and a restaurant or two, so Agua Verde, though it has no cell phone or internet service is fairly cosmopolitan compared to most other places in this part of Baja California.
Later in the day we raised the anchor and continued north 22 miles to Puerto Escondido. We arrived around 1700 and passed through the narrow channel into the lagoon that makes this place an excellent all weather port of refuge. The lagoon is over a mile long and half a mile wide and until recently had over a hundred moorings. Now there are only a few moorings left, and they don’t look well maintained. Ashore, things have declined from the last time we were here. There is still a boatyard with a Travelift and a floating dock and a few boats hauled out here, but the place is pretty desolate. The restaurant has closed down and so has the little tienda. Puerto Escondido should be a thriving community, but apparently there has been a lot of disagreement within the local business community and with the government which has had a bad effect on the village. We had hoped to stock up on fresh food and use the Internet here, but instead we spent one night in the lagoon tied to an iffy looking mooring and left the next morning for the town of Loreto, about 14 miles up the coast.
 |
| Puerto Escondido sunrise. Regardless of the business situation in the village, the scenery remains awe inspiring. |
There is a tiny harbor at Loreto but it is for the exclusive use of the local fishermen, so we anchored outside and took the dinghy into town where we had a nice meal at the Hotel La Mision, checked email and wandered around the town a bit before heading back out to the boat. While ashore we visited a unique museum of sorts, with the skeletons of whales and dolphins on display. Back aboard Finisterra, we spent a peaceful night anchored outside the harbor, then left early the next morning for Caleta San Juanico.
The distance from Loreto to San Juanico is about 27 miles and with scant wind, we motorsailed the entire distance, arriving in the early afternoon. There were four or five boats anchored in the north end of the bay and a couple more at the south end, so we chose a nice spot just off the beach in the middle part of the bay, anchoring in about 15 feet of water. With a light breeze coming out of the southeast and crystal clear water, the swimming was delightful. Later we grilled the last of the dorado I caught a week ago for dinner. The next morning we were underway early for the 50 mile passage to Bahia de Concepcion.
 |
| Caleta San Juanico is dotted with rocky islets. |
The wind blew out of the northwest, exactly the direction we wanted to go, so we motored toward Punta Concepcion until we were a few miles out. Then the wind shifted to northeast and piped up to about 20 knots and we had a fast sail around the point and about six miles down the bay. Then we furled the sails and picked our way through the pass between Punta Piedrita and tiny Isla Pitihaya, toward Playa Santispac. There were several boats already at anchor there, so we bore away toward the little cove at Posada de Conception where we anchored in about 20 feet of water in the lee of some tall bluffs which offered good protection from the strong northerlies that sometimes blow down the Sea of Cortez. Finisterra was to remain at anchor here for the next nine days.
Banderas Bay to Mazatlan
| 0 komentar |Label: banderas, bay, Boat Plans, mazatlan, to
Finisterra finally sailed from La Cruz around 0900 on Sunday, March 30th bound for Mantanchen Bay and then Mazatlan. It was a beautiful morning with a light offshore wind early and the promise of a nice beam reach to Mantanchen in the afternoon. We motored out around Punta de Mita and turned northward in almost no wind, but by noon we had enough wind to sail. We hoisted the main and set the jib and settled down on the reach to Mantanchen in about 10 knots of wind. It was looking like a beautiful day-sail all the way.
Shortly after we got the sails set and trimmed, I heard a strange creaking noise coming from somewhere down below. This was a new noise, not the typical creaks that I was accustomed to. I searched around the boat in all the likely places that creaks might come from, but couldnt find the source of the noise until I opened the starboard lazarette hatch. When I looked down into the compartment I noticed that the bracket for the autopilot ram was moving back and forth in an unusual manner. Then I realized that the bulkhead was flexing and the joint where I assumed Beneteau had spliced or scarfed together two pieces of plywood to make the aft bulkhead was not a joint at all. It was not lapped or scarffed, or even glued together. Nope, Beneteau apparently saw fit to just butt the two pieces of plywood together without the benefit of any adhesive or mechanical fasteners. Then whoever installed the autopilot ram drilled the mounting holes less than a quarter inch of the edge of this imaginary joint. The bracket was mounted with massive 7/16" bolts and a stainless steel backing plate so it looked like a proper job, but looks can be deceiving.
By mid-afternoon we were gliding into Mantanchen Bay and got the anchor down in about eighteen feet of water three quarters of a mile from the beach, which I hoped was well beyond the range of the no-nos that live around here. Then we had a decision to make: We could go back roughly 50 miles to La Cruz or continue on to Mazatlan, another 130 miles north from here. After looking at the weather forecast we decided to press on to Mazatlan. The wind would be on the nose the entire distance but it would be light most of the way. We would be motoring into it and that would put the least stress on the wobbly bulkhead.
To put this little problem into perspective, we were in no danger and the worst that might have happened to us was that we might have to hand steer if the bulkhead failed completely, which was very unlikely. But it certainly annoyed me as a boatbuilder that the boat was built in this manner. And of course the problem needed to be fixed before we ran into any real weather, which is always a possibility in the Sea of Cortez.
The repair was easy enough. I went over to Marine Services Mazatlan, which is located in the shipyard next to Marina Mazatlan and had them cut out some plywood reinforcements that I bonded to both sides of the bulkhead with WEST epoxy. Once the epoxy cured it was a simple matter to reinstall the bracket and ram.
With the repair completed, we were able to spend some time around the pool at the marina and wander around the beautiful city of Mazatlan. In a few days well head northwest across the Sea of Cortez to La Paz.
+(2).jpg) |
| Mantanchen Bay sunset |
Shortly after we got the sails set and trimmed, I heard a strange creaking noise coming from somewhere down below. This was a new noise, not the typical creaks that I was accustomed to. I searched around the boat in all the likely places that creaks might come from, but couldnt find the source of the noise until I opened the starboard lazarette hatch. When I looked down into the compartment I noticed that the bracket for the autopilot ram was moving back and forth in an unusual manner. Then I realized that the bulkhead was flexing and the joint where I assumed Beneteau had spliced or scarfed together two pieces of plywood to make the aft bulkhead was not a joint at all. It was not lapped or scarffed, or even glued together. Nope, Beneteau apparently saw fit to just butt the two pieces of plywood together without the benefit of any adhesive or mechanical fasteners. Then whoever installed the autopilot ram drilled the mounting holes less than a quarter inch of the edge of this imaginary joint. The bracket was mounted with massive 7/16" bolts and a stainless steel backing plate so it looked like a proper job, but looks can be deceiving.
By mid-afternoon we were gliding into Mantanchen Bay and got the anchor down in about eighteen feet of water three quarters of a mile from the beach, which I hoped was well beyond the range of the no-nos that live around here. Then we had a decision to make: We could go back roughly 50 miles to La Cruz or continue on to Mazatlan, another 130 miles north from here. After looking at the weather forecast we decided to press on to Mazatlan. The wind would be on the nose the entire distance but it would be light most of the way. We would be motoring into it and that would put the least stress on the wobbly bulkhead.
.jpg) |
| Mountains behind Mazatlan at dawn. |
.jpg) |
| View from the aft side of the bulkhead. When I replaced the autopilot ram back in 2012 I assumed this joint was lapped but its not. |
.jpg) |
| View from the forward side of the bulkhead. |
The repair was easy enough. I went over to Marine Services Mazatlan, which is located in the shipyard next to Marina Mazatlan and had them cut out some plywood reinforcements that I bonded to both sides of the bulkhead with WEST epoxy. Once the epoxy cured it was a simple matter to reinstall the bracket and ram.
.jpg) |
| Both sides of the bulkhead were sanded and prepped. |
.jpg) |
| Plywood reinforcements bonded in place. The screws were used to clamp everything together while the epoxy cured. |
.jpg) |
| Bracket and ram reinstalled and ready to go. |
Rowing boats
| 0 komentar |Label: Boat Plans, boats, rowing
"Form follows function" was the guiding principal behind the modernist movement as practised by the great designers and architects of the early 20th century.
 Above is a delightful boat from the English west country, you can look at those lines and know she will run cleanly through the water, yet shes able enough for the sometimes choppy waters of the estuary where she was built to work.
 Closer to home this slightly neglected yacht tender resembles a local punt or working boat; stable and designed to carry a heavy load.
Read More..
But the fact is that traditional boat builders had understood that principal for centuries and it was perhaps reflected best in rowing craft which had to be fast, easily driven, carry a heavy load while at the same time be safe and stable.
Above is a delightful boat from the English west country, you can look at those lines and know she will run cleanly through the water, yet shes able enough for the sometimes choppy waters of the estuary where she was built to work.Closer to home this slightly neglected yacht tender resembles a local punt or working boat; stable and designed to carry a heavy load.
Finisterra Update
| 0 komentar |Label: Boat Plans, finisterra, update
In the last couple of months weve been sailing the boat quite a bit. The stackpack system works well. Its different from typical systems in that when were sailing it can be rolled up and secured along the boom instead of staying deployed. Its a bit more work to roll it up but I much prefer the sail unfettered by the bag and lazy jacks.
Awhile back I mentioned that the autopilot was not working properly. After searching the Internet for ideas on how to fix it, I removed the linear drive and rebuilt it, then reinstalled it, confident that Id solved the problem. But I was wrong. So Ive ordered a new drive which should arrive next week.
The boat came with funky pleated cloth curtains on all the portlights. I suppose theyre stylish in a 1990s sort of way, but they are eight years old and at the end of their useful life. We really liked the OceanAir shades we had on the Honcho so we ordered a set from Defender and installed them last week. These shades block out 100% of the sunlight and are good looking.
One thing Ive wanted to change since we got the boat was to upgrade the ground tackle system. The original equipment included a 40 LB Bruce anchor, 40 feet of 3/8" BBB chain and 150 feet of nylon rode. The new system includes a 55 LB Rocna anchor, 200 feet of 5/16" G40 chain and 150 feet of nylon rode. This requires changing the chain gypsy on the windlass. To do that, I had to remove the windlass. This is a simple matter of four bolts. When I got it out of the boat I discovered a lot of corrosion around the base of the unit. Ive noticed that the shelf in the anchor locker where the windlass is mounted is often wet, either with seawater or fresh, so its no wonder the aluminum housing of the windlass is corroded. When I re-install the unit Ill make a mounting plate out of 1/2" StarBoard to raise it up so that it never sits in water.
My winter project is to go through the exterior canvas on the boat. Ill lower the dodger by an inch or two, make some changes to the bimini and have side curtains made for it. Ill also set it up to mount solar panels to it.
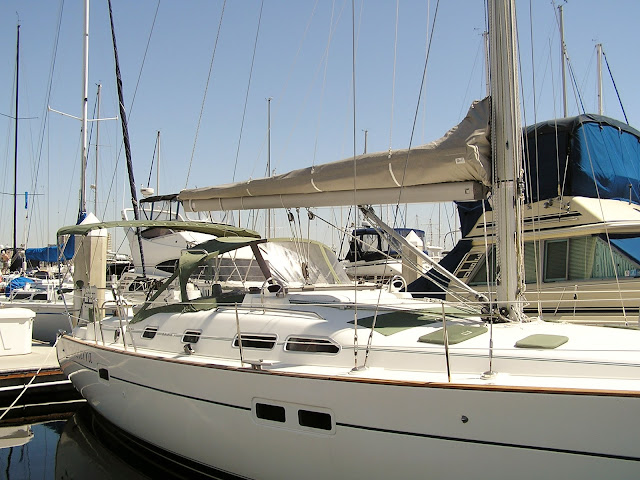 |
| Slick stackpack contains the full battened mainsail |
 |
The boat came with funky pleated cloth curtains on all the portlights. I suppose theyre stylish in a 1990s sort of way, but they are eight years old and at the end of their useful life. We really liked the OceanAir shades we had on the Honcho so we ordered a set from Defender and installed them last week. These shades block out 100% of the sunlight and are good looking.
One thing Ive wanted to change since we got the boat was to upgrade the ground tackle system. The original equipment included a 40 LB Bruce anchor, 40 feet of 3/8" BBB chain and 150 feet of nylon rode. The new system includes a 55 LB Rocna anchor, 200 feet of 5/16" G40 chain and 150 feet of nylon rode. This requires changing the chain gypsy on the windlass. To do that, I had to remove the windlass. This is a simple matter of four bolts. When I got it out of the boat I discovered a lot of corrosion around the base of the unit. Ive noticed that the shelf in the anchor locker where the windlass is mounted is often wet, either with seawater or fresh, so its no wonder the aluminum housing of the windlass is corroded. When I re-install the unit Ill make a mounting plate out of 1/2" StarBoard to raise it up so that it never sits in water.
My winter project is to go through the exterior canvas on the boat. Ill lower the dodger by an inch or two, make some changes to the bimini and have side curtains made for it. Ill also set it up to mount solar panels to it.
Starting the third year by mounting the deck frames
| 0 komentar |Label: Boat Plans, by, deck, frames, mounting, starting, the, third, year
January 2011 was the beginning of the third year of the build. With meticulous records Richard has totalled 2693 hours. He originally calculated 5 to 6 thousand hours to completion....about the half way point?
By subtracting out the 13 weeks lost to building due to injuries and other obligations, but not removing other short times off to see the kids, travel to boat festivals, etc he has averaged 30 hours per week on the boat. Sometimes he works as much as 60 hours per week, especially at times like preparing for the boat rolling.

View of the saloon bulkhead that will be raised to cabin height.

Glassed in subfloor over the integral water tanks.

Glassed and sanded main bilge area with the engine compartment visible in front of picture.

Support framing for the deck and the back lazarette was created at the transom. The sheer was notched and frame pieces mounted to the transom to hold the quarter knees.

After fitting, the quarter-knees, frames and brackets were sanded, finished with epoxy and prepped for mounting.

The brackets between the quarter-knees frame out the lazarette.

The bracket is cut up to allow access into the sides.

Back frames are added to support the hatch.

All frames are epoxied in place and clamped.

Clamps at every angle.

Richard has been being diligent about wearing his "sperm suit" and respirator while doing epoxy work. He started to develop a burn type rash on the inside of his lower arms while using
epoxy in short sleeves. Sanding partially cured epoxy also seemed to increase the irritation. So back to full coverage.

The cockpit was constructed from 3/4" marine plywood. Since creating a smooth nice fillet on the inside corner was a challenge, Richard trimmed and used a piece of cove moulding. The floor of the cockpit will be glassed and epoxied seperately. The rabbet around the bottom of the well will increase the epoxy surface and the floor will be be screwed into place with bronze screws.

A compact cockpit, but since she has a tiller, there will be no binnacle to hog floor space.

A nice view of the frames in place. The center is the cockpit, the left and back are lazarettes.

I couldnt resist another pic of the sweet transom.....

I tried another view, but it is pretty distorted.

More finish epoxy work, fillets, and sanding of the entire inside.

The entire inside is sanded and cleaned.

This is looking into the port side lazarette.
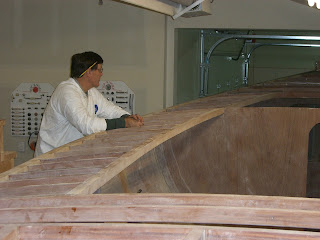
Now....to start fairing the deck frames......lots of arm breaking work to get the tops of the frames smooth in relation to each other.
Read More..
By subtracting out the 13 weeks lost to building due to injuries and other obligations, but not removing other short times off to see the kids, travel to boat festivals, etc he has averaged 30 hours per week on the boat. Sometimes he works as much as 60 hours per week, especially at times like preparing for the boat rolling.
View of the saloon bulkhead that will be raised to cabin height.
Glassed in subfloor over the integral water tanks.
Glassed and sanded main bilge area with the engine compartment visible in front of picture.
Support framing for the deck and the back lazarette was created at the transom. The sheer was notched and frame pieces mounted to the transom to hold the quarter knees.
After fitting, the quarter-knees, frames and brackets were sanded, finished with epoxy and prepped for mounting.
The brackets between the quarter-knees frame out the lazarette.
The bracket is cut up to allow access into the sides.
Back frames are added to support the hatch.
All frames are epoxied in place and clamped.
Clamps at every angle.
Richard has been being diligent about wearing his "sperm suit" and respirator while doing epoxy work. He started to develop a burn type rash on the inside of his lower arms while using
epoxy in short sleeves. Sanding partially cured epoxy also seemed to increase the irritation. So back to full coverage.
The cockpit was constructed from 3/4" marine plywood. Since creating a smooth nice fillet on the inside corner was a challenge, Richard trimmed and used a piece of cove moulding. The floor of the cockpit will be glassed and epoxied seperately. The rabbet around the bottom of the well will increase the epoxy surface and the floor will be be screwed into place with bronze screws.
A compact cockpit, but since she has a tiller, there will be no binnacle to hog floor space.
A nice view of the frames in place. The center is the cockpit, the left and back are lazarettes.
I couldnt resist another pic of the sweet transom.....
I tried another view, but it is pretty distorted.
More finish epoxy work, fillets, and sanding of the entire inside.
The entire inside is sanded and cleaned.
This is looking into the port side lazarette.
Now....to start fairing the deck frames......lots of arm breaking work to get the tops of the frames smooth in relation to each other.
Langganan:
Postingan (Atom)

