We arrived at Puerto Los Cabos Marina a couple of hours before sunset on June 12th and were assigned to our old berth at the end of gangway L. The daytime temperatures here have been hovering in the high eighties, with light southerly winds and intense tropical sunshine every day. The humidity index has also been in the eighty percent range which makes life aboard a bit sticky and sweaty. So I broke out the air conditioner which brought the temperature and humidity inside the boat down to 78 degrees and 50% humidity. The air conditioner is a little 5,000 BTU window unit that fits neatly in the companionway, and stores in the starboard cockpit locker when not in use. It has made life bearable here while we wait.
The only problem with the air conditioner is that it makes you want to stay inside the boat from about noon to dusk.
San Jose is rapidly turning from a town to a city. In 2010 the town had a population of approximately 70,000. Combined with the tourist mecca of Cabo San Lucas a few miles down the road, this area hosted over 900,000 hotel guests in 2011. I remember visiting here in the 1970s when San Jose was a little town that no one went to and Cabo was just becoming popular as a sportfishing destination.
Marina Puerto Los Cabos.
Heres something for the history buffs out there. Back in 1847, during the Mexican American War, a force of 24 American marines and sailors landed with a 9 pounder carronade and took up a position in the old mission San Jose. There, with a reinforcement of twelve men from California, they fought off an assault by a Mexican force under the orders of one Capitan Pineda Munoz. A couple of months later a larger Mexican force returned and laid siege to the American outpost. The seige lasted about a month and was finally lifted when a strong American naval force arrived. Nowadays we dont remember much about our 19th century conflicts, except for the Civil War, and a bit about the War of 1812. At least Ive never seen anyone doing a Mexican American War reenactment.
9 Pounder Carronade. It fired a 4" diameter cannonball. As far as I can determine, this is a British gun dating form the early 1800s, but its probably fairly similar to the one used at San Jose. Photo courtesy of Gunstar.co.uk
As you can tell, weve had some time on our hands while we wait for that weather window to open, but its been fun meeting new and interesting fellow cruisers. A couple of days after we arrived the pretty little Eastward Ho 24, named Molly, with Eric and Christine aboard tied up on our gangway. They sailed Molly down from Portland, Oregon and spent the season cruising in the Sea of Cortez. They left San Jose on Tuesday, June 16th, bound for Mag Bay, where we hope to catch up with them in a few days.
The Eastward Ho was designed by the venerable Walter McInnis and is a pretty salty seagoing vessel.
The weather forecast is for light southerly breezes for the next few days, so we will head out early tomorrow morning for Mag Bay.
Most of my published sailing boat plans come complete with a number of different rig options.What makes mine different from most other offerings on the market is that I try to arrange the various rigs so that the original mast can be used for several different rigs, and that the original mast steps and mast partners can be used. By that I mean that a builder can choose one rig at the time of building, and at a later date, rig the boat differently by simply ordering some new sails and, maybe, making a few different yards, or gaffs etc. But no structural changes need to be made to the boat herself, and the rigs can be changed at will. Each photo below is of Paul Hernes Phoenix III named Willy Wagtail. Even though she is sporting a green sheer strake in the first, second and fourth photos, and is looking nicer with a more plain colour scheme in the other two, she is the same boat, and nothing has been changed other than the sailing rig.
Phoenix III with her sprit rig set without a boom. This can only be done on boats which have had the correct sheeting geometry designed-in from the beginning.
Here is the very same boat, but with a boom fitted. The boom makes the boat slightly easier to handle, and allows more options for sheet locations, but the boomless rig is more seaworthy, as there is no boom to drag in the water if the boat is over-pressed - a situation which often prevents the helmsman from being able to ease the mainsail and can lead to any boat sailing herself over into a capsise
Showing off with her new paint job, Willy Wagtail has been rigged with the balance lug sail. The mast is the original, the mast step is original, and the mast partner is original. All Paul did was use a different sail. Some days, he starts off using the larger sprit rig (which can be sailed with or without the jib) and changes to the smaller balance lugsail if the wind comes up, or if he starts to feel lazy.
This shows the boat sailing under mainsail alone
In this photo, Willy Wagtail is carrying the flying jib from the sprit rig, and a standing lugsail taken from a Joel White-designed Poohduck Skiff - which by coincidence is a design which can also be sailed with or without her jib.
The matter of hull/sail balance is frequently brought up, and one cant just put any rig on any boat and expect the boat to perform properly. The rigs have to be proportioned in such a way the hull balance is maintained within certain limits, otherwise you will end up with excess weather-helm or, even worse, lee-helm. At the design stage I put a lot of time into proportioning the various sail plans so that they will balance. However, you can see from the last photo above that there is a lot more tolerance for centre-of-area and centre-of-lateral resistance changes than the theorists will admit (I limit my comments here to small centreboard and leeboard dinghies - and even then, the rudder and centreboard proportions, area, and location must be taken into consideration when following this line of thought).
This is Periwinkle with her Periauger or Cat-Ketch rig as designed...
...and here she is with the mizzen removed altogether, and the main mast moved back to a third mast partner and step. This step was designed-in to allow just this procedure.
Another shot of Periwinkle moving well with the mast and mainsail in the third location. This arrangement changes the sail area from 155 sq.ft to 104 sq.ft without the need to reef both the mizzen and the main.
Here, the crew of Periwinkle were anticipating tricky conditions outside the cove and had not only used the mainsail and mast in the third location, but had tied in a reef as well.
In this photo, owner John Shrapnel has moved the main mast to the third location, and has set the mizzen sail only. In this configuration, the boat is only carrying 52 sq.ft of sail, but she is under good control and is moving fast. John mentioned eight knots by GPS with the boat very lightly loaded - but anyway, she is going well.
This is another shot from the same day (52 sq.ft mizzen sail only) and I am told by a person who I trust (no names) that Periwinkle was actually overtaking the boat in the background.
Another Periwinkle but this one has been rigged with the gaff-headed cat rig (details supplied with the plans in addition to the cat-ketch rig). The mast is exactly the same as the main mast on the cat-ketch rig, and is stepped in the standard forward location. This rig can also set a small jib not shown here.
John Shrapnel is the most experienced Periwinkle owner at the moment, and he has tried a number of different rigs, and configurations, and is currently using the standard balance lug mainsail (the one from the standard cat-ketch rig), but with the mast set in the forward location (normally balanced by a mizzen mast and sail). One would think that this arrangement would induce lee-helm - something to be avoided at all costs. However, John has pulled the forward end of the boom aft to the mast, therefore moving the centre-of-area of the sail aft enough to prevent lee-helm, and in the process the aft end of the boom has cocked up high above any vulnerable heads. The result is that the rig is now a 104 sq.ft Standing Lug.
See in this youtube clip just how well the boat goes when being sailed by a light crew - in this case one person.
The old-fashioned rigs have got a tremendous amount going for them if you know what you are doing, and if you are prepared to be patient with your development. All basically cordage, wood, leather, and cloth.
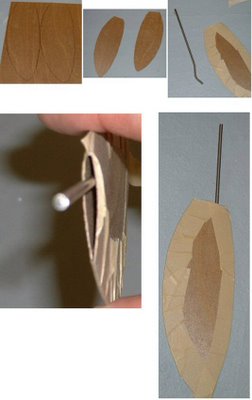
Here are some photos showing one way to build a rudder quickly and easily. The quick overview is cut out the shape in a thin material, tape the sides together, insert the rudder shaft, fill the inside of the rudder with epoxy. This takes about 10 min or so to do. Followed by installation in your boat.
John Fisher
Lay out the rudder shape on a sheet of 1/64 ply. On other class boats John used a single layer of a 6 oz carbon fiber layup, so you could also lay up some fiberglass for use on the star. To do a glass layup, just take a sheet of 6 oz or heavier fiberglass, a sheet of lexan or plexiglass, and some resin. The first step is to spread resin on the plexiglass, then apply the fiberglass and then make sure it is all wetted out. Once cure flex the plexiglass and the layup will pop off.
Shows the two sides cut out of plywood, these could be fiberglass instead. Straight sided shapes like shown and the star plans are easier to make.
Tape the two sides together with masking tape. With curved shapes He taped them together then insert the shaft and resin. If you use straight sides on the rudder you can tape one side and then open it up like a book, apply resin, then close and tape shut. The open book method uses less resin but only works with sq or straight sided shapes.
Note the bend John put in the shaft to prevent it from turning inside the rudder.
Shows the top open to pour in resin. John uses a syringe to pour in resin once the shaft is in place. You can add micro balloons to the resin if concerned about weight.
Sam the canvas man arrived today for the second fitting of the pram cover. The design of the cover will permit the screen to remain in place with the cover completely down but can also be lowered or fully removed if required.
There will be more side windows on the finished cover
and a dodger around the base
The front screen
I also collected the oak doors from the carpenters today. The small set will replace the steel ones in the forward bulkhead. The tall ones are the bedroom and bathroom doors.
While Sam was working on the cover I cut out all the holes for the additional electronics to be fitted. Photo of this in a few days when they are fitted.
5000 kids with not a turkey in sight, a CEOs Thanksgiving wet dream, a little needful reading, and easily the best description/rundown of the current clown car posse Ive yet come across...
Considering the day, I cant think of a better way to get started by saying thank you for reading Boat Bits, thank you for coming back, and thank all of you who drop me lines with your thoughts, links to neat stuff, and friendly banter. Its appreciated and I know Im lucky to have such a great audience.
I signed onto the Wooden Boat Forum the other day and to my utter delight someone else had created a post on one of my boats, the Deblois Street Dory. At the wonderful 2nd annual Fall Shop and Messabout, I finally had an opportunity to sail the D St. D myself. First off, the talk and messabout was wonderful. We had special guests, Walter & Karen Wales, Sam & Susan Manning, and Thad Danielson. Over 35 people attended.
Together under one roof, the speakers represented about the most knowledge about dories alive today. Walter is infamous for his experience with the Marblehead Gunning Dory, using the boat all his life for the designed purpose of the boat: rowing to ledges and hunting ducks. Sam is renowned for his drawings of boats in general but, to my mind, especially for his illustrations in the Dory Book by John Gardner and Sam. Sams drawings are what inspired me to design my own dory, the Deblois Street Dory. I very much would like to produce a kit for the Marblehead Dory at 18. Who would like one? Let me know...would you like it at the originally drawn 196" or 18 or 16?
How about the Deblois St Dory...would you be interested in seeing this boat available as plans and/or a kit? More photos of the D St Dory underway:
More on the 2nd annual Fall Talk & Messabout can be seen on the WBF thread "2nd Annual Shop Talk and Messabout at Clint Chases Shop"
More about the WB thread on the Deblois Street Dory
The Star 45 R/C Model Sail Boat - Builders Journal A Jib Tweaker adjusts the length of the jib sheet. A Jib Twitcher pulls the job boom wing on wing while sailing down wind
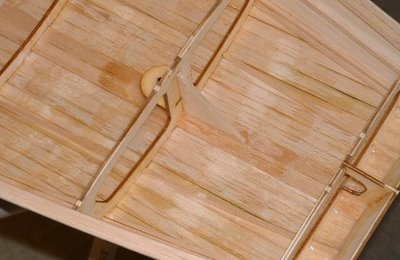
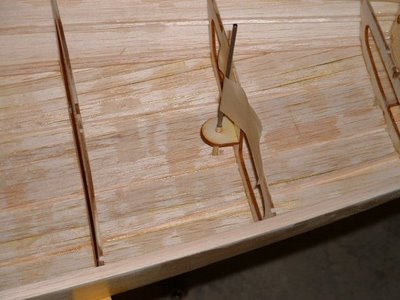
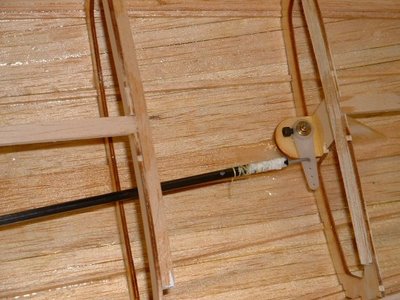
Drum Servo with Jib Tweaker from Dave Ramos To: Star45@yahoogroups.com Sent: Fri, 14 Nov 2008 10:23 am
The following photos show my set up for a drum servo and jib tweaker. Hope this helps David Ramos, Chesapeake Performance Models 227 Main Street, Stevensville, MD 21666 email: david@rcyachts.com www.rcyachts.com


.jpg)