Swedish Sailing Pilot Boat Lotsbat Skum

| 0 komentar |
Geoff Leedham is a teacher at St. Philips College Alice Springs, here in Australia. Alice Springs is right in the centre of Australia, thousands and thousands of kilometres from any coastline, right out in the desert country. Yes, you have to have schools everywhere, but what makes Geoff unusual as a teacher is that in this arid and remote location he runs a boatbuilding program for high school students. Geoffs program involves at least four different designs (to my knowledge - there may be more) and exposes the participants to a range of differing construction methods and techniques - for this I commend him.

Geoff with some of his students. The beautiful boat they have built, and are displaying here, is an Iain Oughtred-designed John Dory
Imagine what sorts of problem-solving issues have been dealt with by the high school students who built this boat
Another view of the John Dory as she sits in the school foyer, displaying the complexity of work required from a young team - art, engineering, chemistry, arithmetic, manual arts, project management and housekeeping to name a few.
As you may have determined, Geoff Leedham is an enthusiast, and like all nautically afflicted people, he has his own dreams. Some months ago, Geoff approached me by email and phone, seeking help with a pet project. The design he wishes to build represents a Sailing Pilot Boat from around 1910, and Geoff has obtained basic historical drawings from Bertil Andersson in Sweden. http://www.batritningar.se/Default.aspx.

There are two problems: -
  • there is no table-of-offsets;
  • Geoff wants to build in glued lapstrake and therefore hopes to minimise reverse curvature in the hull to simplify construction.
With this in mind, and having spoken with the plans supplier, Geoff asked me whether I could produce a modified set of lines which avoid the use of reversed sectional curvature, supply a set of building offsets, and draw up a schedule of scantlings for the new construction method. And just to top it off he wanted a heart-shaped transom in place of the original wine-glass.

An outboard profile and plan view taken from Bertil Anderssons website. Id like to show you the body plan so as to give some indication of the extreme reverse curvature, but I do not want to show material without permission. However, you can take it from me - this is a curvatious boat in the extreme!
Here are the principal dimensions courtesy of Bertil Andersson: -

LotsbåtSkum
20½ foot.Length 6190, width 1800 mm.From Kalmarsund. Build in 1910s by Pelle Fräsare in Kalmar, Småland. Completely in oak.


Wondering whether my friend Mr Leedham had handed me a poisoned chalice, I gave it my best shot, and here are the results: -

These are my lines incorporating many changes from the original boat (which I commend to you, with the suggestion that you purchase plans from Bertil Andersson). You can see that cross-sectional reverse curvature has been reduced greatly, particularly amidships and in the run, but that the profile and plan have remained in the spirit of the original. This will be a lighter boat, reflecting her changed construction method, but she retains the character of the original with minimal changes. 


The above renderings show the modified Skum at 6.197m x 1.836m x 0.525m draft ( 20 4" x 6 3" x 1 8-1/2") at a displacedment of 1041kg (2,290 lbs)

Below is a youtube video showing a fibreglass replica of the same, or similar boat to the one in the original drawings, under sail.


In addition to the lines drawings and off-sets, I have supplied Geof Leedham with a fairly detailed scantlings schedule, which I may publish if there is interest, and if Geoff agrees. He has paid me some money, and I need to be sensible with what I publish in case he refuses to take me for a sail!

Isnt it amazing to see what comes from a scheme to build boats in the desert?

Read More..

Goat Island Skiff Boat Kits Available

| 0 komentar |

Our first kit offering at Clint Chase Boatbuilder is a plywood and timber kit for the Michael Storer designed Goat Island Skiff (GIS). Why buy a kit? Folks are sometimes offended when I suggest this, feeling that it is thought they dont have the skills to make the parts themselves, but that is not it at all. We build all of our boats in the shop from kits!!! Even professionals do it and the reason is that it makes the build process quicker and smoother and the result is more professional. In the case of the GIS, we have made parts and built the hull of the boat, making all the small tweaks that professionals with a good eye make to the lines of the boat to make them look eye-sweet. Any design, no matter how well drawn, will need some eyes on it in 3D to make final tweaks. We also have checked bevels and made some adjustments for a rabbeted gunwale, which covers the end grain exposed at the top of the gunwale. Our kit captures all these professional practices so you can get a better boat. Currently, kits are cut per order, but we may move to CNC when volume increases.

We were attracted to this design initially because of the sail plan, a beautifully proportioned Balanced Lug. Upon further reflection we noticed something was missing for RAID sailors and for others who might use the boat as a sail & oar craft. It needed a mizzen. A small mizzen gives great control of a small boat, allowing one to lie head-to-wind for reefing at sea or for heaving-to. It allows you to back off a beach or a dock, with practice. It is useful for trimming the sail plan, adjusting weather helm to create "feel" in the tiller. A mizzen makes single handing much easier, especially for switching between oars and sail, because the boat will tend itself and stay head-to-wind while you stow oars and fidget with things at the mast. For a useful diagram showing How to Sail a Lug-Yawl, by James McMullen.

We can supply a kit for the GIS as well as the mast and spars. Masts are round, hollow using the Birdsmouth technique. Yard and boom for the GIS are solid, laminated Northern White Spruce. Laminated spars stay straighter over time with changes in moisture content in the wood. We can make custom 9 oars specifically designed for the GIS. Rowing in the Goat Island Skiff is quite enjoyable, whether it is from the dock to a local area with wind, or coming back when the wind has petered out. Products for the Goat Island Skiff can be seen in the GIS Flyer on our website Goat Island Skiff Page.
Read More..

Fundamentals of Model Boat Building Should be on Your Holiday Shopping List

| 0 komentar |

Do you have a tinkerer? Someone that wants to make that model in the closet, but theyve become frustrated? Do you have a child with artistic promise who could use something to help them focus their abilities? Do you wonder how a soon-to-be retiree is going to manage without going to work every day? Do you know a fantastic model maker who is looking for quality books that have information that they can really use? Do you know a boater that needs something to do this winter? Are you looking for a good book to read? Would you like to fill out that shopping list with something inexpensive?
 
You ought to take a serious look at “Fundamentals of Model Boat Building” by master model makers John Into and Nancy Price. Here are some reasons why...

Do you have a tinkerer? Making a model of the “Annie Buck”, a real Chesapeake Bay workboat is sure to make them very happy. Especially because the photographic instructions are clear and easy to follow.

Someone that wants to make that model in the closet, but theyve become frustrated? “Fundamentals of Model Boat Building” provides all of the information necessary to beat that frustration and make model kit building enjoyable again.

Do you have a child with artistic promise who could use something to help them focus their abilities?“Fundamentals of Model Boat Building” not only teaches techniques, theories, how to see a thing and make a 3D replica of it, but how to collect information, organize it, come up with a plan of action and how to turn that plan into reality. It is a book that will continue to provide interest as they grow.
 
Do you wonder how a soon-to-be retiree is going to manage without going to work every day?
 “Fundamentals of Model Boat Building” teaches the art of “scratch-building”. Its readers learn how to see something that they choose and turn it into a model. Scratch-building has no limits. Easy to read and understand, the book is also thorough and thought provoking, leading to an avocation that is both challenging and fulfilling.

Do you know a fantastic model maker who is looking for quality books that have information that they can really use? Professional and experienced amateur model makers have praised this book for covering information that model makers usually learn the hard way, sometimes incompletely, by trial and error. Although the book is clear enough to be understood by a novice, it is presented in logical sequence and provides advanced information about materials, tools, special measuring tools and techniques, substitute materials, how to carve wood, how to draw basic plans, how to work with lines drawings, understanding offsets tables, how to measure a boat, understanding different types of construction design and much more.

Do you know a boater that needs something to do this winter? Boat lovers will find lots of information about boat design, including information about displacement hulls and planing hulls. A boater can use the 5 categories for differentiating boats from one another and test their knowledge regarding structural and measuring design features that can be applied to any boat. For example: “What is deadrise?”

Are you looking for a really good book to read? This is a “coffee table quality” book. There are stories about boats, the people that use them, what they do, how they do it, where they do it and how these elements are important to why a boat looks and performs that way that it does. What models are, how they are used in every area of life, some history of model-making, how models differ in construction methods and display types – these are some of the things covered in surprising detail. Several people with no previous interest in either boats or model making have been happily surprised at having found a unique book that is not only informative, but entertaining.

Fundamentals of Model Boat Building(ISBN-9780764331053) is a hard-cover book published by Schiffer Books, LTD. List price $34.99. It has160 pages with 264 photos and 94 drawings, all in high color, on fine paper. It has received numerous excellent reviews from magazines, blogs and readers. Available world-wide -It is not currently available for e-books.


To see some reviews and to find out where you can get your copy, please go to
 
http://intothings.com/fundamentals.html
 
For an extra special gift, you can also get a copy of Fundamentals of Model Boat Building
personally autographed by authors John Into and Nancy Price
please call 410-745-5954.


Read More..

Ceiling Lighting

| 0 komentar |
This week so far has been about putting up the ceiling and installing and connecting the lighting.

You need to remember here that as I said way back, "I dont do wood".  I previously used laminate flooring to do the roof and walls of my narrowboat.  Armed with the success of this I decided early on that I would again use laminate flooring for the ceiling.  In my previous NB I used it crosswise.

Like this

But the design I want to use on the widebeam is like this.


With the use of a very realistic textured oak effect laminate this is how its turned out.

It looks very real

Of course flooring laminate isnt designed to be fixed to a ceiling.  The main problem is getting it to stay in place and getting it all to click together so it has to be done one strip at a time waiting for the adhesive to go off before the next strip can be put up.  Here is a bit of time lapse of the process.

 
Double click for full screen

The lighting used is 12v 60 LED warm white GU10 equivalents.  These bulbs really are as effective as the 50w halogen originals, but with less than 1/16th of the current consumption.  The lounge area is lit by 12 lights which means the whole area is lit for less power than 1 x 240v 50w halogen bulb.

Tomorrow is going to be a big tidy up day.  :-(     but mum is coming round so I think she will be deployed on the broom :-)


Read More..

Building Forms

| 0 komentar |


The basement exercise room became the room of choice for building the boat....never got any use as an exercise room anyway. I didnt want to tear out the carpet, so the old ping-pong table that needed to disappear became the foundation for my form. I reinforced the underneath side of the ping-pong table with 2x4s and by rotating each half 90 degrees I got a platform 4.5x10. I surrounded it with 1/4" scrap plywood used for floor protection in a former life and I was ready to go. We wont talk about what it took to clear the room out of all the accumulated stuff.


I decided to add 8" to the height of the form going to 32" rather than the 24" called out on the plan. I thought my knees would appreciate it. To support the stem and breasthook, I got a little creative with an extention off the platform to get the height and length needed. With the old stereo speakers now mounted up on the walls and out of the way, Im a-building and a-dancing.

Read More..

Shiny Stuff

| 0 komentar |
I have been working with the pram cover maker to make the stainless steel tube frame to take the cover.  Normally he contracts this to a SS specialist.  He normally makes a light alli tube frame as templates then the SS guy does his bit.  Between us we have made the frame combining his know how and my metal skills.  This has saved over £500 in labour. So under the white cover at the back I now have a fully collapsible frame.  IMO the SS guy is on a nice little number.  The 316 SS tube was a dream to work. 

 The screen frame

 The front screen will be a self supporting structure.
More on this when it gets fitted

 Port side


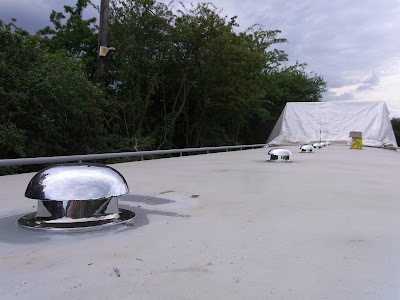
The other shiny bits added are the mushroom vents.  Its one of those jobs I have held back to when I had nothing much else to.  Currently I am waiting for the internal doors and frames and the front doors.  I should get these next week.

6 fitted and one to do later once the hatch is finally fitted

If you look closely you can see the 3G aerial behind the 3rd vent.  The yellow bit is a cover blocking off the hole for the gas fire flue.
Read More..

Bulkheads

| 0 komentar |
Monday 12th Nov 2007
Bulkheads front and back of the engine room.
As the hull is still floppy, it had to be jacked into the correct shape to fit the bulkheads.
Very slow to fit but a 100% fit makes the boat hull true to shape and is the basis for all the rest of it to follow.


BHD 8 fitted.


Big thanks to Paul for the 2 hours he gave us as we really needed an extra pair of hands.!

Interesting fact... the boat is now split into 3 compartments. You have to get off one bit to climb onto another as the bulkheads are so high !!.
Read More..